
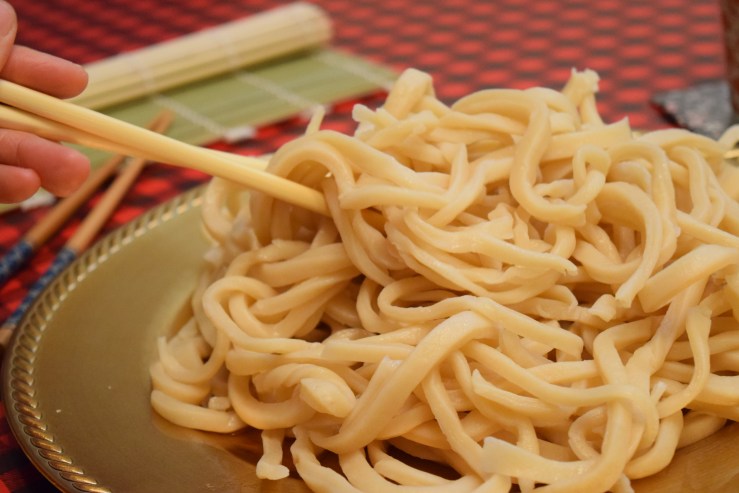
The first variation of noodle I learnt to make is udon. It is a thick, white noodle with a chewy texture. When my husband and I were staying in Japan, we joined a cooking class during our trip to Osaka and learnt to make udon. But it is only after a year later that I decided to make udon at home, after we moved to the States. Since then, I have been making udon at least once a month.
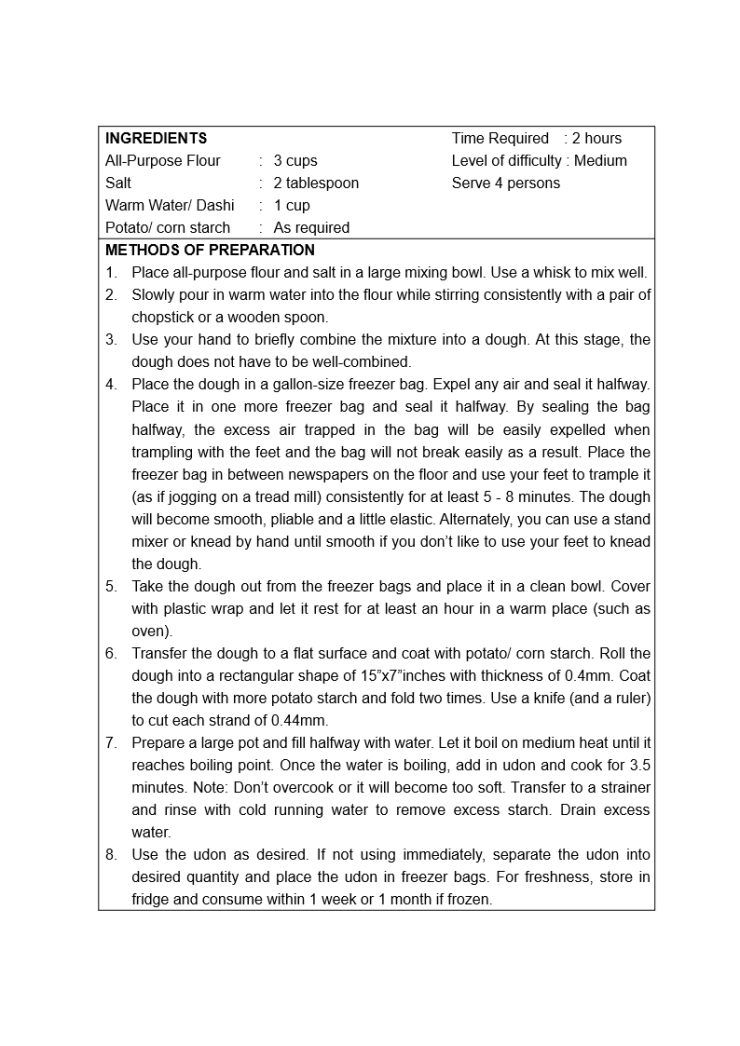
If you are beginning to learn to make noodle, this is a great start as the ingredients are simple and no pasta machine is required. Only 3 ingredients are needed, i.e., all-purpose flour, warm water (or dashi) and salt. I use King Arthur’s Unbleached All-Purpose Flour with 4% of protein. Since the flour is unbleached, the udon I made is slightly yellowish rather than the usual white color. And it is recommended to use flour with a higher percentage (around 6-9%) of protein if you want a chewier texture. For this recipe,I use warm water. But you can substitute with dashi. Dashi is a soup broth cooked with kelp and bonito flakes. It has a distinct smoky flavor. For those times that I use dashi, I noticed that it enhances the taste of udon.
There are a variety of ways to knead the dough to become smooth and pliable. Through the cooking class, I was taught to knead the dough using a more traditional way, i.e. place the dough in 2 freezer bags and trample it with my feet consistently.
")
")
")
This uses the strength of my body to knead the dough and doesn’t feel as tiring as kneading by hand. I have been using this method since then 🙂 But you can choose to knead the dough with a stand mixer or by hand if you don’t like the idea of using your feet 😉
Once the dough is smooth and no longer sticky, place it in a bowl and cover with cling wrap. Let it rest in a warm place such as oven for at least 1 hour.
")
")
I normally let it rest until I am ready to cook it, which is around 2 – 3 hours. When the dough is ready to be rolled, make sure to dust enough potato / corn starch on the dough and roller. It is better to dust MORE so that it doesn’t stick together when cut into noodle. Roll the dough to a rectangular shape of an estimated size of 15″x7″inches with 0.4mm thickness. I find it easier to roll the dough around the roller and continue to roll in one direction several times. Then I unroll it and repeat the same with the opposite side so that it has the same thickness. I repeated the process for few times until I get the size I wanted. Then I use my hand to gently stretch the sides to become more even.
")
")
")
")
")
The key is to roll in a way that you feel most comfortable with. Dust with more potato/corn starch and fold in 3 parts.
")
")
")
Use a knife and a ruler to measure and cut each strand of 0.4mm.
")
")
Place the udon onto your palm and gently stretch it with another hand.
")
")
Prepare a bowl of boiling water on medium heat. Place the udon into the boiling water to cook for 3.5 minutes. Stir gently so that it doesn’t stick together.
")
")
Once cooked, rinse under cold running water. Drain the water and ready to use.
")
")
For storage, I like to portion the udon according to 1 serving size and place in freezer bags. It should be consumed within 1 week if refrigerated or a month if frozen. When ready to use, thaw and/or rinse with cold water.
For a printable version (in pdf) of the recipe, CLICK HERE.

Published by